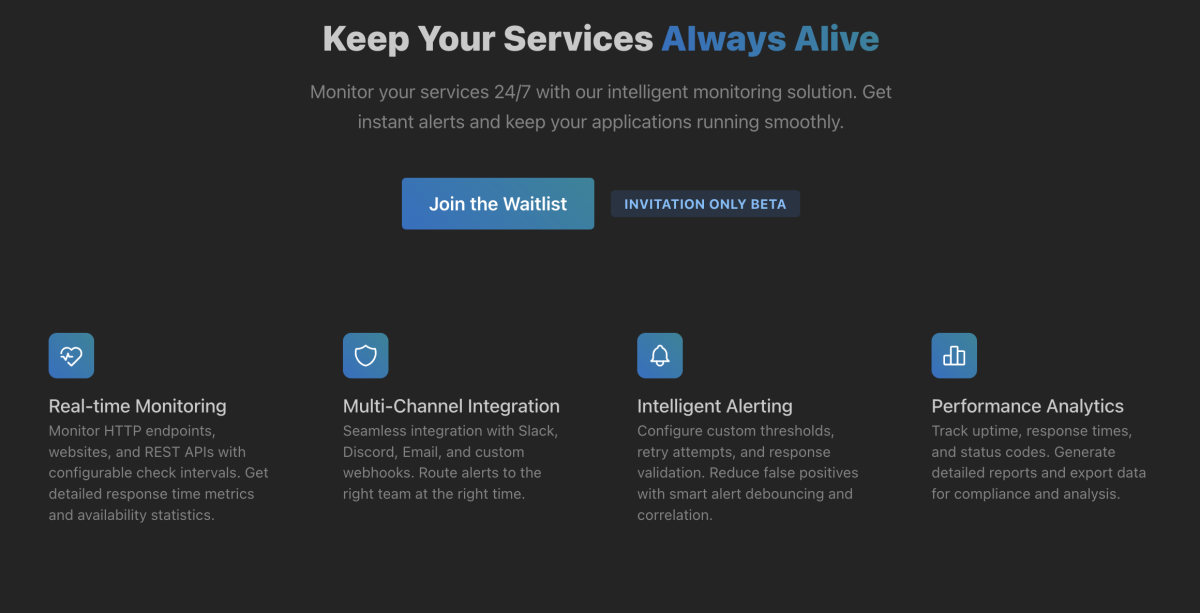
GitHub’s New ‘Copilot’ Feature Is A Game-Changer If You’re a Developer

You’ve probably heard about Github Copilot by now. Github Copilot is an AI-driven pair programmer who can help write code more efficiently and faster. Here’s a quick review of Copilot.

How to install Copilot?

If you’re using VSCode, then installation is pretty simple as it can just be installed as an extension.

Once installed, you want to make sure you have either an active trial or a subscription. You can manage your subscription from https://github.com/features/copilot


How does it work?

Using Copilot is simple. As you start writing code in either Go/NodeJS/Typescript or Python, it will give you small previews of code snippets. You can even get full functions written by AI. All you need to do is add a comment explaining what this next block of code is supposed to do.

load all tweets of user

As shown above, once you write a comment explaining the next code block, Copilot automaticlaly suggests a python defintion with all of its code. In this case, Copilot handed me all code to retrieve tweets of a specific user.

This was a simple example, so I decided to try out using pymongo for interacting with a MongoDB database and its collection. See what happened this time.

update age of all users to 20

I was pleasantly surprised that Copilot was able to generate code that connects to a MongoDB database, uses a collection, and then sets the age of all users to 20.

It’s impressive that it knows the “custom” MongoDB syntax to query and update something in a collection but also that it has chosen to use update_many() which is different than update_one().

As my last test, I figured it would be worth testing if Copilot can create multiple functions that interact with each other. Of course, it didn’t disappoint. This time I decided I wanted to read something from a database, store it in a Pandas dataframe and then update a column within that dataframe.

function to read from sql database and load to dataframe

read dataframe and update column age


What does it cost?

After you use your 60-day trial, you’ll be charged $10/month or $100/year.

In my opinion, if you write code daily, this is a no-brainer and it seems obvious how it can help you to be more efficient.

Smart Home Hub Choices

Smart lights are everywhere and come in all colors and price ranges. You can get the cheapest smart light bulbs for under $10 a piece. For many people, smart lights are often the first touchpoint with the smart home category. For the majority of folks buying a few Philips Hue lights and controlling them via the Hue app is sufficient.

However, if you want to go past smart lights and look at motion sensors, multipurpose sensors, water leak sensors, smart thermostats or security cameras, you’ll quickly find yourself installing 3+ apps on your phone in order to control everything. Even with all the apps installed, you’ll likely have some products which don’t properly integrate.

Credit: https://9to5mac.com/2019/05/24/categories-of-smart-home-tech/

Why should you care about integrations?
If your devices are not integrated, you won’t be able to have your motion sensor turn on a light and also have the security camera start a recoding. Or , have a water leak sensor trigger a notification to your phone and also play a sounds on all your speakers in your home to notify you.

Smart Home Hubs to the rescue

A smart home hub promises to solve the integration problem and it’s purpose is to provide a single interface for all devices. Many of us already own a hub, such as an Apple TV with HomeKit, Amazon Echo or Google Home device. All of these devices can act as a smart home hub for their ecosystem, with Apple’s Homekit having the smallest ecosystem and most HomeKit-enabled devices come at a premium. The downside of all of the above hubs is that they only work with wifi-enabled devices or need another hub to integrate with non wifi-enabled devices.

Why is being limited to wifi-enabled devices a problem?
It’s not necessarily a problem but it likely will limit your choices, which come at a premium. Most sensors (multipurpose, water leak, smoke detector, …) don’t have wifi capabilities and use a different protocol (Zigbee or Z-Wave). Also, if you want to connect non-wifi devices with a wifi-only hub, you’ll need another hub and another app to manage it.

What other hubs are out there?
There are numerous smart home hubs available on the market and it feels like there are new version coming out ever other month. Some examples are:

Samsung SmartThings Hub
Logitech Harmony Home Hub
Wink Hub
Vera Hub

Samsung SmartThings Hub is one of the most popular choices due to it’s ease-of-use, price (fairly in-expensive) and wealth of integrations and sensors they sell.

What should I be looking for in a smart hub if I want to go beyond smart lights?

  • Does it have integrations for the devices you want to use? (Ring, Ecobee, Nest, …)
  • Does it work with my Voice Assistant?
  • Do you trust the company with your information? (You may decide to install a smart lock)
  • Is the mobile experience easy to use?
  • What do others say about the hub? (Reddit)

If you ask me, Samsung SmartThings is the clear winner!

My first smart home hub was a SmartThings Hub. The iOS app works great and they integrate with over 120 different vendors.

On top of this, you can find a lot of used SmartThings hubs on ebay for cheap. And, if you want to stay within the SmartThings brand, you can. find lots of sensors and switches from them.
I personally use their water leak sensor, multipurpose sensor, motion sensor and light bulbs. Additionally, I also use a ton of Zwave and Zigbee devices, plus a few wifi-enabled devices. Overall the Samsung SmartThings hub is a great choice. Btw, it also works with Amazon Alexa and Google Assistant. Don’t forget to check out my article about Choosing the right Voice Assistant.

Choosing the right Voice Assistant

Over the past several months, I got more interested in smart homes and home automation in general. I like the idea of triggering automations, schedules or scenes based on voice commands or with my iPhone.

Most of us use an Amazon Echo or a Google Assistant/Home device to dip our feet into the smart home space. To be honest Amazon and Google make it very easy for one to get started. However, as you start using the products, you’ll find the notable differences. Amazon Echo works fantastic across all devices, whereas Google Home is amazing for Android users. iOS devices had its fair share of limitations when working with the Google eco-system.

Read More

Getting CKA Certified

This post is several months overdue, I actually got my CKA in September 2019. As you may have heard, Kubernetes is everywhere and will sooner or later take over the world.

I’ve been working with Kubernetes and containerized workloads since July 2017 and it has been a blast. Back in 2017, it was fun to talk to customers who were told to containerize their workloads but didn’t really know how to fully operationalize containers, forget monitoring or securing such workloads. Initially, I got my hands dirty with Docker Swarm and eventually learned to use Kubernetes and some of it’s modified versions, such as RedHat OpenShift.

When I joined Sysdig in October of 2018, I started out as Principal Technical Account Manager before I took over Professional Services. Our Professional Services team is made up of experienced and highly technical Cloud Engineers/Architects, who know there way around Kubernetes pretty damn well. As I started working with them, I realized I knew a lot about Kubernetes but not nearly as much as they did. I do believe to truly bring change to an organization, you first have to fully understand the in and outs of the people you’ll lead. With me being fairly technical, I thought: “What better way to understand what these folks do on a daily basis, than shadowing them and eventually try to replicate their work in a lab environment.”

Sure enough, I spend several months deploying Kubernetes, breaking it and re-deploying. Eventually, I learned the patterns in which Kubernetes breaks and how to troubleshoot it rather quickly, without lengthy Google searches.

I purchased the exam on September 1st 2019 and took the exam on September 3rd 2019. I was confident that it cannot be as hard as people described on the many blogs out there. A couple of hours after taking the exam, I received an email stating that I failed by reaching 72% out of 74% – required to pass. Seriously…2%…

The next day, I rescheduled the exam for September 9th and doubled down on the questions I previously could not answer. Obviously, I did pass on the second try.

Lastly, here are some common questions I’ve received from friends and coworkers.

Why should I get CKA certified?

As I mentioned at the beginning, Kubernetes is taking over the world and became the orchestrator of choice for many. I believe the number of people who are CKA certified is still limited but it’s increasing steadily. I believe achieving the CKA certification, still helps you to stand out of the crowd. However, this will surely change over the next 9-18 months.

What was your exam experience?

This exam was a bit weird because someone is actually watching your screen and webcam while you take the exam from your own computer at home. Overall, it worked well and I didn’t have any technical difficulties and like the fact that you can take the exam from home. Another interest aspect of the exam was that it’s very very hands-on.

How did you prepare for the exam?

I highly recommend Cloud Native Certified Kubernetes Administrator (CKA) course from Linux Academy. It was well done and covered pretty much everything which was part of the test.

Additionally, my #1 tip would be to familiarize yourself with the Kubernetes docs and how to successfully find things. Why? Because you can use the docs during the exam and if you know to search for things, it will greatly speed up the time it takes to find answers. I used the docs probably for 2-3 exercises and was able to quickly find the solutions.

Any tips for passing the exam?

Be creative! Remember your Kubernetes commands. Don’t try to write all the yamls from scratch, instead, remember the -o yaml option in kubectl. It will save you a lot of time and avoids syntax errors.

Running Usenet Stack as Docker Containers

In Running Usenet Stack on Kubernetes, I covered how to deploy a Usenet stack onto Kubernetes.

Image result for docker container

As it turned out, Kubernetes has won the race as the orchestrator of choice but not everyone is running it in their home lab just yet. I received multiple requests how to translate my YAML files into Docker run commands.

This image has an empty alt attribute; its file name is text256.png

sudo docker run -d –name=radarr -e PUID=1000 -e PGID=1000 -e TZ=America/New_York -p 7878:7878 -v change_me:/config -v change_me:/movies -v change_me:/downloads –restart unless-stopped linuxserver/radarr

The above command will launch a docker container from the linuxserver/radarr image and publish the application on port 7878.
Before you just run the above command, please make sure to change following paths:

/config
stores the configuration files

/movies
location of the downloaded movies after it has been moved from the /downloads folder

/downloads
download folder where your NZBGet or SABnzbd app will store the downloads

sudo docker run -d –name=sonarr -e PUID=1000 -e PGID=1000 -e TZ=America/New_York -p 8989:8989 -v change_me:/config -v change_me:/tv -v change_me:/downloads –restart unless-stopped linuxserver/sonarr

This is basically doing the same as the container for Radarr, except this application will be launched on port 8989. As with Radarr, Sonarr all needs some paths updated before launching the above command:

/config
stores the configuration files

/tv
location of the downloaded tv shows after they have been moved from the /downloads folder

/downloads
download folder where your NZBGet or SABnzbd app will store the downloads

Image result for nzbget

sudo docker run -d –name=nzbget -e PUID=1000 -e PGID=1000 -e TZ=America/New_York -p 6789:6789 -v change_me:/config -v change_me:/downloads –restart unless-stopped linuxserver/nzbget

In my other post, I covered SABnzbd but I’ve recently chosen to go with NZBGet on Docker as it has been more reliant in my lab. NZBGet’s default port is 6789 and if you don’t have a good reason, I would just keep it on the default port. NZBGet has one configuration less than Sonarr and Radarr:

/config
stores the configuration files

/downloads
download folder where your NZBGet is going to store all downloads. This folder needs to be accessible by Sonarr and Radarr.